05 June 2012

Nursery Project: Ikea RAST Hack

I've been stuck on finding a dresser for Dash.  I really didn't want to spend much - definitely not over $150 and the cheaper the better.  I looked at flea market and antique stores, and yard sales and couldn't find anything with the modern lines and still in good working condition, but still enough of a fixer upper that its base price is cheap.  To add to my impossible list of wants, I wanted more than 3 drawers and a lower chest rather than a tall skinny one since I plan to put my antlers above it.

The room has seemed a little incomplete without  a dresser and maybe a little bland.

I found the solution to both of these problems.

Another wonderful DIY that Bryce couldn't wait to be a part of.  :)  He always puts more work into them then he expects, or than I lead him on to expect.  But they turn out soo good!  He's wonderful.

Here were some of my inspiration DIY dressers I've been saving:


Then on a recent search I found the inexpensive RAST dresser at Ikea and thought maybe I could find some DIYs on that...jack pot!  Here are some of the DIYs using only the RAST dresser.


Before


After

fabric covered drawers

overlays

ombre

hand painted/stencil


filing cabinet-esque


loved the wood grain and cream on this one


really fun with the handle cut outs and modern take on wood grain.  So fun for a kid's room.


version done with the numbers on the drawers (maybe the kid's birthday?)...Bryce vetoed any numbers

 well done with them side to side


This one really struck a chord because of its multi use...so I used this as my starting point.


 I decided the RAST was the way to go so we made a quick game plan and went to Ikea.


The process: 
Stain the outside wood pieces and paint the drawer fronts a cream.  Our original thought was cream with wood and the cream would be high gloss.  This to Bryce means smooth I guess...we learned that the wood grain texture will come through several layers of paint unless you want to sand it all down and do some serious prep to the surface.  We did not...so we threw the cream idea out the window and decided since it wasn't going to meet Bryce's expectations or vision in his head that way to do something totally different.  A color!  We chose a green that matches the Ikea boxes I loved in my preliminary planning.


Assemble the dressers, screw the long board across the top to make the bones for our final piece.
(we cut out faux feet from the little support apron that runs across the front under the drawers.  I just didn't like the full apron to the floor look.  Guess I'm a leg girl.)
 bottom shelf is installed - we're still deciding if we want a second shelf, a wire basket instead of a shelf, or nothing else if we're putting something tall on the shelf.


Our Before:


Our After:

 We love this because the height will be perfect for a toddler desk.  Once Dash is old enough we'll remove any shelves from the middle and then buy a chair and he'll have a desk and dresser all in one.  Pretty sweet we think.  It looks so good in person.  We decided we couldn't have all the drawers plain green (which probably would be fine) so we again changed direction in the middle of doing the work and held a 30 second pow-wow throwing out ideas.   Paint a pattern on some of them, or leave one or two cream, or let's put a stripe.  Bryce liked the (racing) stripe idea and taped those off for me.  Looks really good.  Can I say that again?!  We really like it and for about $125 and some manual labor, we think it's worth it.


As we were finishing cleaning up the room I saw the laundry basket I bought and thought, maybe a regular size pillowcase would work as a liner for it...wait, I have pillowcases left from the same sheet sets I made my crib sheets from.  I love the grey with the stripes so I ran (as much of a run as I could do with this growing belly) and got them.  One wasn't wide enough so I stuck them both in there thinking I could cut and sew them together to make it wide enough and realized I could make a laundry-separating liner so I don't have to separate the vomit and poo covered clothes.  Touch them once to put in the laundry basket, and not have to touch them again.

A brilliant flash of genius:


 The colors together match the border on the rug.  I jut need to actually sew the tops together and maybe put a stiffening material between.  Pretty cool idea huh?!


Still to go on the project list:
barn door
wall o shelves
crib sheets
mobile
find a dresser
mount and hang antlers
window treatment
put shelves and rods in closet
stenciled pillow
figure out what to do with the small navajo rug that's thrown on the back of the chair


19 May 2012

Nursery Project: Crib sheets (and a revealing)

While my dear mother (and father, and brother and sister) was in town for Mother's Day weekend, I starting thinking about what color crib sheet I wanted or what design, but I didn't want to pay much for them.  The kid just sleeps on them after all.  And then they'll get exploded on.

I remembered that I had the fitted queen sheets from the sheet set I made my downstairs curtains out of years ago and thought maybe if I knew how to make a fitted sheet I could use those to make my crib sheets - for free. :)  I also found my old dorm sheet I used for 1 year that's baby blue t-shirt kind of sheet.  My mother, the sewer, of course knew how to do this and so we cut them out and she sewed up 2 to show me.  That left me with 3 to finish sometime.  I did it today.  I sewed all three and they all fit and look great!  I'm really excited about them and I was pretty pumped this morning with their completion.  So much so, that I told Dash how awesome his mom was - and that it was no wonder he chose our family to come to.  It was an achievement for me and they were free!  I'm feeling pretty good about things today...

The chocolate circles remind me of Dwell Studio stuff and I love the silkiness of the gray fabric.  These are some posh crib sheets.


We measured the size of the mattress- I grabbed the dimensions from Ikea's website - and added 2 inches to each of the 4 sides so the sheet would reach around to the bottom.  We cut a square out of each corner (whatever the depth was including the 2 inches) and then french seamed the corners together.  Put elastic in the corners and then hemed all the way around.  Really not that bad.

What's your favorite?


We can't get enough of this barn door so I keep showing it off. :)


The copper pig is Bryce's from childhood, the silver crab you can barely see is Bryce's from his Grandfather Long who was stationed in Sicily during WWII.  It's engraved Sicily 1944.  We love the wooden train.  I need to get some baskets and bins and books to fill the shelves now. :)


I really wish I would've taken pictures of the room's clutter, then cleared out, then empty with the walls painted, and then with the things going in it slowly so you could see the amazing difference.  But maybe it's good I didn't, because you don't really want to see all that.  You want to see the finished product!  It's not finished yet, but here's what you get right now.  Oh, the random bag on the floor is the diaper bag I purchased the other day.

Next on the project list:
barn door
wall o shelves
crib sheets
mobile
find a dresser
mount and hang antlers
window treatment
put shelves and rods in closet
stenciled pillow
figure out what to do with the small navajo rug that's thrown on the back of the chair


Nursery DIY: Final Photos

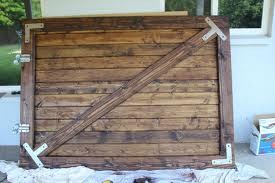
 The 'Barn Door' we built from scratch an this is what it looked like raw.  

Then we thought maybe we'd like some metal brackets like our inspiration photo.  I can't tell you how many doors I looked at over and over again so it's not like this is the one door I saw and said, "Yup, that's the one!"  I share this picture, because the wood tone and worn look is what we liked.  We decided we wanted a bit more 'interior' look to our door than the 'outdoor' barn door with the diagonals or z design.

The other DIY that I had planed was a "Wall o' Shelves."  This was based on a photo of reclaimed wood planks laid across braces hung on tracking.  A little more rugged and industrial than a regular bookcase or floating shelves.
  We ended up deciding to put them a little higher off the ground so they're not as accessible to climb early on and then decided I didn't need them to go all the way to ceiling so we stopped about doorway height.

We originally bought cedar planks because of the neat ombre coloring on them for the shelves, but when we finally got down to it, we returned them and bought the regular douglas fir or whatever is at the lumber  yard.  Cheaper and they'd match our door staining exactly.

 Here's the mounting board we stained first as a tester.  It is what we screwed into the studs on the wall and then mounted the door track to this.  Bryce picked out a grey/blue stain that mimics that of the Ikea crib but I knew we wanted a natural wood tone so I bought Miniwax's Special Walnut and rubbed it on with a cloth.  We then went immediately back over it with a wet rag of the grey and rubbed it in/off with a dry one.  The walnut color is GREAT and the gray doesn't really show, but sure did a lot for making the wood look older.  I really love the outcome of the staining!  It's interesting to see how each piece of wood takes the stain differently and gives you a unique look each time.


The stained door!

door track mounted to the wood.  The wood has already been predrilled and marked for hanging on the studs.

up on the wall...getting so close...getting so excited for the final product...


Wa LA!  Finished, hung, balanced, and brackets and handle are on!

Stained shelves - I didn't take before pictures, but it's the same pale wood as the door was.


Thanks Mom and Dad for coming to visit and working so hard while you were here!  I love the door and shelves and Bryce loves that you were here to help do it so he didn't have to.  After all, he did make the door - I really couldn't expect him to hang it too. :)


Here's a little sneak peak of the nursery decor.  We went to Ikea to buy the rug I wanted after their next shipment came in.  They came in on Wednesday but we planned to go Saturday morning, so I called Saturday morning and asked if they had some (before we took the hour drive there) and they said, yes, we have 8.  We found them after some looking, but they were down to 3.  Good thing we went when we did!  While we were there, Bryce, because he loves Ikea so much, decided that while still kind of early for putting a nursery together (I was 16 weeks I think) we better get whatever else we wanted from Ikea because there would be no second trips. :)  Smart man.

We got a little bored one night a few weeks later and decided we wanted to put the chair and crib together so we did.  Here's a sneak peak of what we added to the mix since then as well.

I bought our first bit of clothing for Dash - a little something for next spring and a zip up jacket and pants for this fall and winter.


while at TJ Maxx I spotted these two options for wood side tables.  Long story short:  I found this one at West Elm on line for $153 on sale and loved it.  It looks awesome in the picture!  Couldn't commit to it because of the price and then finally saw one in person and was not impressed.  So I could let my heart move on.  I was looking at using old barrels as a side table and spent a couple days looking around on eBay.  Then I found these.  I had to have.  Big decision to choose between the two styles.


Here's the side table with the chair and ottoman and little sheep rug stationed, ready to be put in the nursery.  At this point we're still waiting for the room to be cleared out, painted, and the sliding door to be hung.